I have been sewing 9 inch LeMoyne Stars by machine. They are not “Stack n Whack™” but they give a wonderful kaleidoscope effect.
SEWING LEMOYNE STARS BY MACHINE
I enjoy hand piecing small LeMoyne Stars (4.5 inch and 6 inch) with Inklingo but I would rather machine piece the long seams in a 9 inch LeMoyne Star.
There are tips and a few “new to me” sewing suggestions for LeMoyne Star online, including video. I won’t mention the names of the teachers because I immediately ran into problems.
Sewing stars by machine is NOT MUCH FUN without Inklingo!
- Some of the sewing sequences are very confusing.
Which end do I start at for this seam? For that seam? - A traditional method of folding and re-folding resulted in mistakes like sewing a triangle where there should be a square.
- Manually marking where to start and stop for the inset seams is slow and not accurate enough.
- Pinning through several layers makes the intersections shift, especially at the center of the star.
- The seam allowances bunch up at the beginning of the seams when sewing outward from an inset point.
- Blocks are not pressed so the seams will nest when they are sewn to another LeMoyne Star.

- Most annoying of all, when instructions say “press to the left,” do they mean this “left” or that “left?” I have to keep finding the pictures.
Good news! The confusion is not necessary.
INKLINGO METHOD
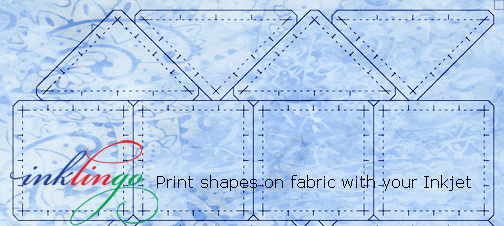
With Inklingo, we have the crosshairs accurately printed on every piece and that makes a “radical” approach possible.
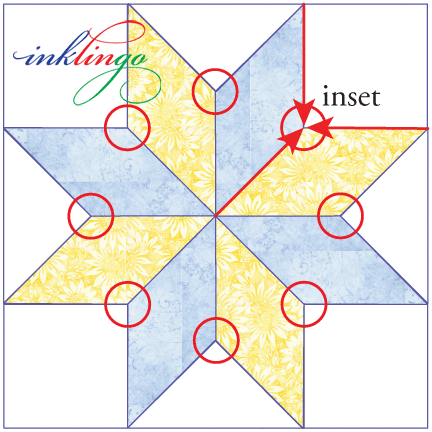
Sew every seam ending at the inset crosshair!
This may sound like a bad idea until you try it.
I have machine pieced several stars this way now and I love the results.
I have prepared a one-page guide (PDF), but you might not need it at all if you can remember “sew toward the inset” and “press clockwise.”
It’s that simple!
ADVANTAGES
- Since it is simpler, it is easier to remember and to avoid mistakenly sewing a triangle where there should be a square.
- It works efficiently for chain piecing.
- There is no need to “press as you go”—just finger press until the block is completely finished.
- There is no need to pin the center intersection at all. Don’t do it!
- It is not necessary or desirable to start sewing precisely at the center of the star, so it is easier.
- You are likely to get a perfect center on your first try, but if you don’t like it, you just have to un-sew a few stitches, not the whole seam.
- Seam allowances don’t bunch up at the beginning of a seam because they are always away from the machine needle (toward you).
- The final press distributes the bulk so the intersections are beautiful and the seams nest perfectly when sewn to another LeMoyne Star.
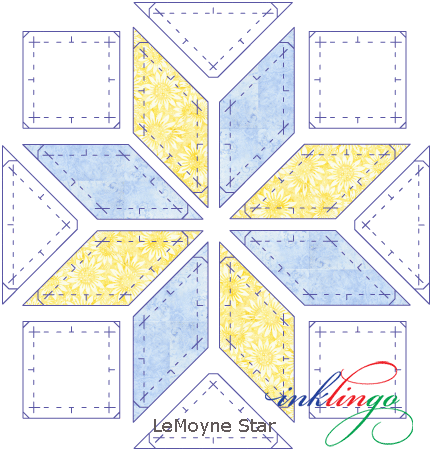
Start with the pieces laid out in order beside the sewing machine, wrong side up, looking like a star. If you are making several stars, lay out two at a time for efficient chain piecing.
AS USUAL
Always sew a “scant” quarter inch seam allowance. This means you do NOT sew on the line. Sew immediately beside it in the seam allowance, the way we always do.
RADICAL?
- All seams end at the insets (circled in the diagram above). If you remember this, you will always know which piece should be on top when you feed it into the machine.
- You only need ONE pin.
- Beginning of every seam: No pin and no back-stitch.
Start at (or near) the edge. The stitching will be secured by crossing seams. - End of every seam: Pin through the crosshairs, stop stitching at the crosshair, and reverse or back-stitch for one or two stitches.
You don’t have to end EXACTLY in the crosshair. Close is okay as long as you never take a stitch beyond the crosshair. There is a VIDEO showing how I use this same method for hexagons by machine.
This might seem radical but it ensures a matching center where the 8 diamonds intersect and perfect insets that lie flat without puckers.
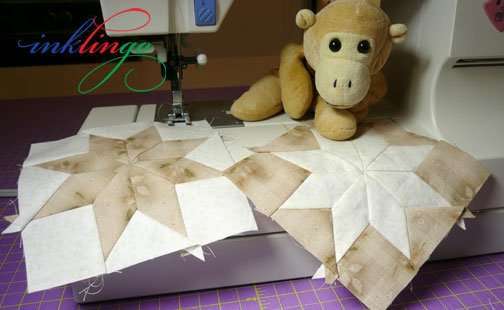
I sewed these 4.5 inch stars by machine and they look good! I printed two combo layouts, so it was fast.
TRY IT NOW!
The new 9 inch LeMoyne Stars are perfect for machine piecing this way but if you aren’t afraid of small blocks, you can try it with the free Diamond Triangle Square shape collection right now!
The one-page guide (PDF) might be all you need, but here it is, in detail.
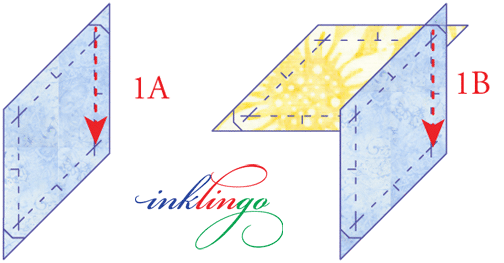
1. STAR HALVES
- 1A—Sew 4 seams ending at the inset.
- Finger press so the seams will be pressed to the side around the center CLOCKWISE. (Remember that, okay?)
- 1B—The seams will nest together when you sew 2 seams to form two identical star halves. Finger press clockwise. (You remembered!)

2. CENTER SEAM
Seams in both halves are finger pressed so they will go clockwise around the center intersection, so they will nest perfectly when you sew the two halves together.
The center is sewn in two seams, not one.
- Pin at the crosshair at the end of the seam (the inset), but not at the center intersection.
- The seams will nest together. Your fingers will tell you if the center feels tight.
- 2A—Start sewing about 0.25 inch before the center (no backstitch) and finish at the inset crosshair.
Take a peek before you sew 2B.
If you nested the seams so they butt up against each other, the center will look perfect. If not, rip a few stitches and re-position so the seams do butt against each other. (I have not had to rip yet!)
When you are satisfied with the center intersection, turn the pieces over so you can sew 2B, the last half of the center seam.
- 2B—Start sewing about 0.25 inch before the center (no backstitch) and finish at the crosshair marking the inset. (This is exactly the same as 2A.)
Again, start a little more than a quarter inch before the center, cross the center and finish the seam as usual at the crosshair. The stitching overlaps in the center, so it is secure without backstitching.
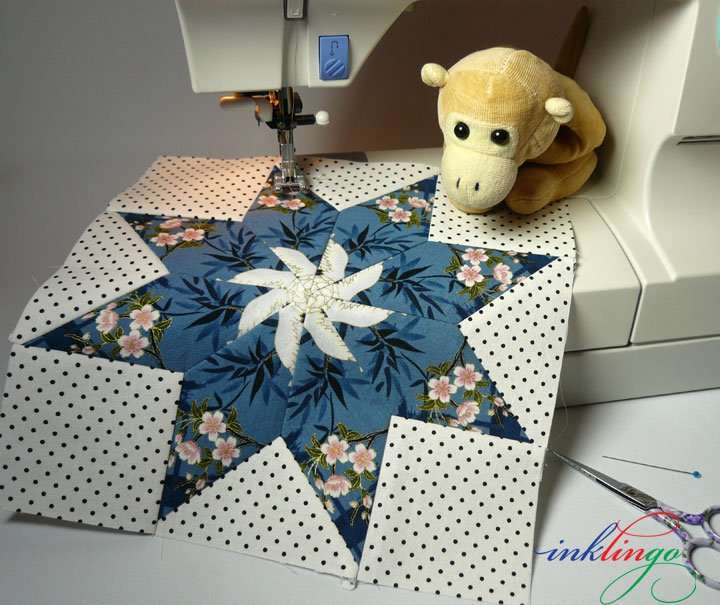
Release a few stitches to let the center open up in a little star (image below, left). (It doesn’t have to be a perfect star. Just distribute the bulk the best you can.)
3. ADD THE TRIANGLES AND SQUARES
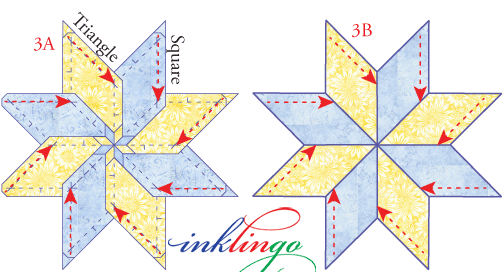
Since everything is laid out in order beside the machine, you can add the triangles and squares in any order you like, but the same rules apply: All seams end at the crosshair marking the inset.
When you are sewing 3A, the star is on top when you feed it into the machine. When you are sewing 3B, the triangle or square is on top. You don’t have to remember that if you remember to sew toward the inset.
At the beginning of each 3B, finger press the 3A seam allowances in the direction you are sewing (red arrows). That keeps everything neat and flat when you are sewing plus it makes the pressing easier when the block is finished!
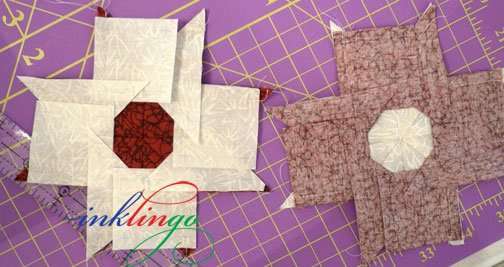
This is how it looks if you sew all the 3A seams before you sew any 3B seams.
I prefer to sew 8 seams 3A to add alternating triangles and squares (above) and then flip the star over to sew 8 seams 3B, but you can sew in any order. For example, you can alternate 3A then 3B for each triangle or square.

4. PRESS
If you remembered to press all the seam allowances to the side around the center in a clockwise direction, the other intersections are pressed in a counterclockwise direction!
Very cool, flat and neat.
BONUS! The block will nest with an identical LeMoyne Star block when sewn into rows. That makes everything easier.
The low intro price ends soon. $25 is great value, but $20 is even better.
DOWNLOAD THE ONE-PAGE GUIDE
I hope you will try this method and let me know what you think. I might do a YouTube video after I get some feedback.
For now, you can download the one-page guide and get started!
You can see more of my LeMoyne Stars on Facebook too.
If you want to see what I share on the Inklingo Facebook page in your timeline, please go to the Inklingo FB page and click “Get Notifications” in the drop-down menu under the like button.
The more “likes” and comments and “shares,” the more FB thinks I am posting something worthwhile, and the more quilters will see it—an upward spiral.
If you have a FB account, you can post your own photos (POTC? DWR? GFG? a new LeMoyne Star?) on the Inklingo page AND you can share mine on your timeline.
I posted this quilting meme on the Inklingo Facebook page today and I have many more “memes” to share.
I hope you will join the fun and “share” my photos on your FB page.
If you are new to Inklingo, I recommend starting with the FREE Diamond Triangle Square shape collection. so you can print shapes for a 4.5 inch LeMoyne Star to sew by hand or by machine.
The free shape collection includes the first chapter of The Inklingo Handbook. With that and the Top Ten Tutes on the blog, you will be an Inklingo expert in no time!
ARE YOU SUBSCRIBED?
Facebook is fun but the blog is still the best place for me to teach, so I hope you will subscribe (top of right sidebar).
There is so much to say about the new LeMoyne Star 9 inch shape collection, we will be writing about it for weeks!
Thank you for visiting here and on Facebook.
Linda & Monkey
New to Inklingo? Order and download free shapes and start sewing in the next few minutes. Quick Start (Always FREE.) There are triangles, diamonds, and squares in the free collection—great for dozens of different blocks.
$10 Coupon! 8 Year Anniversary Special on the handbook
25 Signs YOU are an Inklingo Quilter
Have you liked the Inklingo FB page yet? AND chosen “Get notifications?”
If you haven’t, please do. Thank you!








Hi, Linda, love love inklingo, just started and already have gone crazy. I am trying to read through your website as thoroughly as I can, and I know somewhere it told me to look in your blog and download a one page pdf on Chain Piecing for the Sewing Machine. I cannot for the life of me find it, I looked and searched everywhere could you please help me out here.
Hi Wendy,
Thank you for writing. I am pleased to know you are enjoying using Inklingo so far.
I don’t remember this in particular but I searched on the blog for “chain” and found machine piecing instructions on a few pages.
http://www.inklingo.com/shop/shapes-with-curves/13/product/pie-and-tarts/95 (2011)
and
http://www.inklingo.com/blog/easy-4-patches/ (2015)
and
http://www.inklingo.com/blog/how-to-sew-lemoyne-stars-with-inklingo/ (2014)
There are several other one-page guides in the design books and on the blog. There are also tips for chain piecing in the chapter on machine piecing The Inklingo Handbook, which you have.
If you have any other questions, please ask. I hope you have a wonderful week with time to print and sew!
Hugs,
Linda & Monkey in Canada
great instructions – I just came back to refresh myself on this tutorial
This is genius, Linda! It flies in the face of everything we’ve been taught before about sewing inset seams by machine!
Thanks for dreaming this technique up! I wish I was a fly on the wall of our sewing room!
Oh, wait! We are!
Wonderful construction instructions! I’d love to see you make a video, sometimes written instructions are overwhelming to people where a video could clarify it more quickly.