
I love my finger pincushions. They’re dainty and indispensable.

Machine or Hand
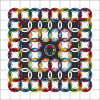
These are great for machine piecers (left), and hand piecing snobs (right).

They even work for lefties!
I wear a finger pincushion when I am machine piecing, when I am hand piecing, and sometimes when I am not sewing at all. (Ooops!)
If you forget to take one off when you leave the house, Monkey says you should try to wear one that matches your outfit.
They are fun to make, so there’s no excuse not having one to match.
There are written instructions in a few Inklingo Shape Collections, but they are so simple you can probably just watch the movie (70 seconds).

1 minute how-to
What I used:
- scraps of cotton fabric
- Inklingo Circles – printed 1.5 inch circles on fabric (named with the finished size)
- rotary cutter and mat (Use scissors if you prefer.)
- quilting thread for a running stitch to gather the circles
- finger-sized spool of thread
- scraps of batting (Silk is v v nice.)
- 1/8 inch elastic
- tweezers to coax the elastic through little holes
- a bit of patience (see above)
- big buttons
- glue gun and hot glue
Russ listened to the William Tell Overture over and over again. (Licensed from Unique Tracks) It’s okay because he laughed when he saw the final result.
We have written about circles before, here.

You could WIN
Leave a comment before Tuesday March 6 to be in a drawing for one of my pincushions, okay? If you don’t win, you can make lots of finger pincushions for yourself and for friends anyway.
This was not on the official To Do list, but it was a nice break. Can you tell I was having fun?
We’ll be back soon with more about the winners in the EQ/Inklingo Love the Lines Contest too. Thanks for visiting.
Linda & Monkey

New to Inklingo? Order and download free shapes and start sewing in the next few minutes. Quick Start (Always FREE.) There are triangles, diamonds, and squares in the free collection—great for dozens of different blocks.
Love the finger pincushions! And Monkey is sooo cute! Thanks to Bonnie for pointing me in your direction.
What a clever idea – I must certainly try.
Really cute idea. Came by way of Bonnie’s blog.
Oh how I love these! Although it’s bedtime right now, I think that I will dig into my button jars right now 🙂
Oh, before I forget: thanks for the chance to win one!
I love those pincushions! And Monkey too 🙂
I came here because Bonnie sent me. What a cute idea. I think I need several of these little finger pincushions. I also loved your speedy tutorial.
Too cute! Bonnie said the video was great and she didn’t lie!
I like these so much better than the bottle cap base! And talk about an easy way to get a perfect circle for the project! Inklingo to the rescue again!
Oh my Gosh, this is the cutest pin cushion I have ever seen. Your monkey reminds me of my quilting friend’s bear Rosco. He goes everywhere with us and quilts, naps, eats, plays checkers. A special monkey and a special bear. I would love to win one of your/monkeys pin cushions. Thank you very much Bonnie for keeping us in the know.
Maryella in Maine
I just watched another tutorial at another site yesterday. Yours is SEW much speedier and simpler and cuter – or is that because of Monkey? Even if I’m not a winner of the contest, we are all winners in making quick cushions!
I love monkey! Would love a hand piecing snob’s finger pincushion!
Waaaay cute. Looks like lots of finger pincushions will be made.
Bonnie sent me – So cute! I wish I had a Monkey Helper like you. Maybe if I play the William Tell Ovature my sewing would go faster – you think? Thanks for the Video.
I would love to win a finger pincushion. I have a great excuse for not making them myself: I don’t have a hot glue gun, and am afraid of using a tube of superglue, ever since my coworker accidentally glued her thumb and index finger together with one of these. They were stuck for three days, since the doctor did not want to cut it loose!
I am so clumsy I would probably glue myself to the table or something, which would be worse 🙂
I love your tutorial and can’t wait to make my own finger pincushion!!
This is just too cute! Came to see the video based on Quiltville’s recommendation. Love the pincushion…and the monkey! I’m going to have to read more to find out his history. Thanks for the great idea and the smiles!
I have to make a gift for a stitching retreat and this just shot to the top of the list.
Thank you Linda and monkey
That has got to be the cutest thing ever.. Love the ring. What a way to save some time (I seem to always be looking for my pin cushion). Looks like a great gift for a fellow quilter.. Thanks for the wonderful video, I might could do this. May your day be filled with Blessings from God..
I am in love with the tree monkey. Is he celebrating Leap Day? If we made on with fairy frost, do you think we could use it for an engagement ring? Way too much fun to be useful. Thanks.
I am inspired! I can make these as gifts for all the participants at an upcoming retreat. Thanks for the wonderful instructions.
What a cool idea, Linda. These would make great gifts for fellow quilters. I loved the video and Monkey’s role in it and the choice of music was perfect.
hi linda and monkey. it looks like you both had so much fun making this little movie. plus we got to actually see linda’s hand. monkey must have been in a sharing mood. hehe just teasing. great job on the ‘quick’ tutorial. patti in florida
Cute project. Would love to have one of those. Thanks for the tute and your music is great!
Great video and project! This looks so easy I am going to try to make one today.
So absolutely cute and practical! Monkey — I never thought about using them on my ears, but I see it works for you.
Thanks for the tutorial. I would love to win one of theses but can now make one if I don’t.
Monkey just looks so adorable wearing all those finger pincushions. Wouldn’t mind having one for myself.
I love your video! And your finger pincushions are too cute! I’m going to link back to this on my blog, if that is all right with you.
I hope I win one, but in case I don’t, I have a tutorial to show me how to do it! 😉
I have seen these made with plastic bottle caps but using a button is so much more fun!
So easy, so fun, so necessary. I see lots of gifties in the future…. sure glad Bonnie sent us your way.
Thanks for this cute and useful project. I’d love to win one, but I’m glad to know how to make one 🙂
I think these are so cute. Even if I don’t win, they really look easy to make.
OhmyfreakishWord! Love the video! I was giggling thru the whole thing! So glad Bonnie (Quiltville) sent me your way!
Love the video – and the pincushions. I can’t wait to try this.
What a great idea!! I saw your link on Bonnie Hunter’s Quiltville and had to check it out, now I need to get stuff together to make a few finger pincushions. I think they will make great gifts for the other sewers in my family. Thanks!
Love the pin cushion…love the music….love the monkey!!!!
Your comments are keeping us in stitches. By the way, we used to have a box full of bottle caps too, but it was too hard to drill two nice holes and they were big.
Also, as Cyn suggested anyone can put the vid on their blog. The more the merrier. It’s a great way to share.
I loved your video with such energetic music! I would love to have one of your pincushions. I love all of your blogs…… have a wonderful sewing weekend.
I never liked wrist pincushions, but I do like how handy finger ones are. Thanks for the chance to win!
great tutorial. Thanks for your great blog. Lots of top ideas here
I enjoyed this video and I am especially interested in the concept of
making the cutting process easier. The pincushions are adorable.
I will have to try to make some. Thank you for sharing. Now if I had all the energy that the music gave me.
Carolyn
Super vid! Thank you. Monkey looks happy wearing all the Finger Pincushions. Is he handling his Super Star Status ok? lol
Thanks for opportunity to be in drawing… may I put your vid and pic on my blog?? Is that ok?
Hugs xoxo
Great tutorial and music. Now what do I use the bottle caps for?
Have been saving them but something was stopping me from making them. The buttons are way cuter!!!
Think I will make a couple of these for my guild give away, but if I could win one would be better. Cute idea. Thanks. Robert, in snowy northern Iowa.
A fun tutorial and a great project. Thanks!
How adorable, these would make great gifts :0)
thanks for the chance to win!
Happy Sewing
Love them!!! Love your video!!! Love Monkey too !!!
Nice Video! Love the Music! I would love to have one of your finger pincushions. Also, if I won one then I would have a sample to see and I could make more for my friends.
Great tutorial! Love the music!