I love my finger pincushions. They’re dainty and indispensable.
Machine or Hand
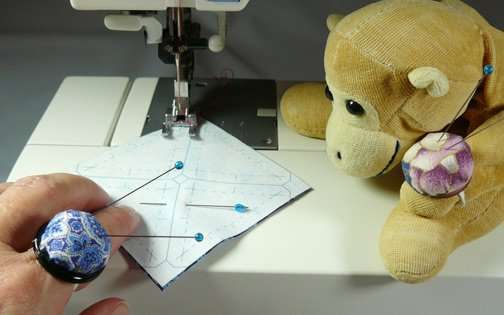
These are great for machine piecers (left), and hand piecing snobs (right).
They even work for lefties!
I wear a finger pincushion when I am machine piecing, when I am hand piecing, and sometimes when I am not sewing at all. (Ooops!)
If you forget to take one off when you leave the house, Monkey says you should try to wear one that matches your outfit.
They are fun to make, so there’s no excuse not having one to match.
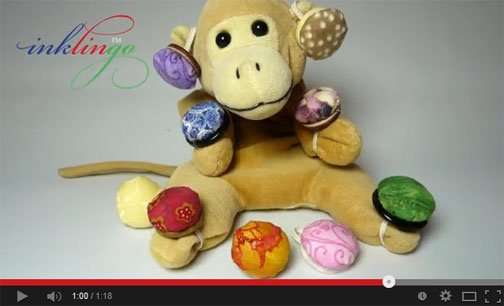
There are written instructions in a few Inklingo Shape Collections, but they are so simple you can probably just watch the movie (70 seconds).
1 minute how-to
What I used:
- scraps of cotton fabric
- Inklingo Circles – printed 1.5 inch circles on fabric (named with the finished size)
- rotary cutter and mat (Use scissors if you prefer.)
- quilting thread for a running stitch to gather the circles
- finger-sized spool of thread
- scraps of batting (Silk is v v nice.)
- 1/8 inch elastic
- tweezers to coax the elastic through little holes
- a bit of patience (see above)
- big buttons
- glue gun and hot glue
Russ listened to the William Tell Overture over and over again. (Licensed from Unique Tracks) It’s okay because he laughed when he saw the final result.
We have written about circles before, here.
You could WIN
Leave a comment before Tuesday March 6 to be in a drawing for one of my pincushions, okay? If you don’t win, you can make lots of finger pincushions for yourself and for friends anyway.
This was not on the official To Do list, but it was a nice break. Can you tell I was having fun?
We’ll be back soon with more about the winners in the EQ/Inklingo Love the Lines Contest too. Thanks for visiting.
Linda & Monkey
New to Inklingo? Order and download free shapes and start sewing in the next few minutes. Quick Start (Always FREE.) There are triangles, diamonds, and squares in the free collection—great for dozens of different blocks.


You do this during your BREAK? ? ? How lucky are we to have you show us the ropes! 🙂 The least we can do to thank you is make one for YOU!
Thanks for the giggles and all the work it took to put this together. Making one of these is a snap in comparison!
What fun! I had other quilting things to do today, but now I only want to make finger pincushions!
Loved the video!! will have to try some when I get home to my stash. Thanks for the giveaway too.
Marge
great video, great music, great pin cushions! Thanks Linda and Monkey, do you do live performances?
LOVED your tutorial!! Great gift idea for friends….thanks for sharing and making us laugh.
A pin-cushion from Monkey?! Yes please!
Very cute Linda, now I can’t get THIS song out of my head! LOL!
Bonnie
Great tutorial and fabulous video. How fun! Monkey is adorable.
What a cute and useful pincushion. I like it when people show you how to make their product. Makes me want to try it out too. thanks for the cute video and chance to win.
Great tutorial! Love the music!
cute! would love to win one.
Karen
Linda and Monkey, your videos are the best! I love the little pincushion! Thanks for sharing!
I love it and it sure looks simple. Thanks for the info.
I could make one but it would be so much fun to win one.
Lovely pincushion!! I’m going to make one for me – ond maybe a few other folks. But, I’d love to win one made by you!!
These are so cute! Thanks for the giveaway!
Thank heavens I’d not just taken sip of coffee!!! I couldn’t stop laughing! Love the shot of Monkey wearing many pincushions! I think yours are the best finger pincushions I’ve seen — the buttons are so much nicer than the bottle caps! Love ’em!
Thanks for making me laugh!
I’ve seen them made with bottle caps but I like this even better! Thanks
Hello, Linda;
I just spent yesterday looking for a tutorial for finger pincushions! I did not want to use a bottle cap for the base. I saw yours on your last video and thought, I need one of those. Here you are with Monkey making it simple, again. Never thought of using a button.
Hugs to you and Monkey!
Emily
Who is left handed and is fast becoming a hand piecing snob!
What a great idea, and a fun video. Thanks for a smile this morning.
Hi Sweetie,
I laughed the whole way thru the video. You have turned a rainy S FL
day happy.
Hugs,
Frummie
I want one too! LOL
I want one!
I have a bunch of buttons that would be great for doing this. Where are my scraps?
Great video, Linda. I feel your pain with editing, ads and jumping through ridiculous hoops. I love your finger pin cushions! I could never wear the ones using bottle caps. The buttons will be much more comfy for arthritic hands.
Brilliant! I have a 5 gallon glass bottle FULL of old buttons – plenty of fodder for making these pincushions. Thanks for the great tute!
Loved the finger pin cushion video! I am just learning how to make my first tutorial video. The pincushions would be a great addition to any guild retreat goody bag! The music sounds great.
Wonderful! And Monkey looks so happy to have so many to choose from and use! Thanks you for such a fun tutorial!
very useful. thank you. hugs
I have wanted to make a finger pincushion. Your great video is my inspiration to make one. Thanks. Nancy
DH heard the music and came over to watch (2x) said I should make some for our girls (after he was done laughing)
quiltldy57 aka Pam.
I loved the video and you choice of music was perfect!
As usual, you and Monkey have outdone yourselves again.
Love you both!
Ooh, I’m going to have to go digging for big buttons next time I’m at the wool lady- she has a washtub full and I can never find marching ones. Now I’ll dig for big ones.
It is nice to breakaway from the official to do list on occasion, especially when it gives you a sense of satisfaction of completing something in the midst of a complicated project. Thank you for the tutorial. Now to head to my button jars.
Charlsey
Lovely, I will have to make some of these. 🙂
Love the tiny finger cushions. I use one too that I made with a plastic diet coke bottle cap but now I want to make a one using a button. The video was great and love monkey!
thanks for the wonderful videos. linda gerig
This looks like a perfect quilting bee gift for our retreat. I’ll be making about 20 of them before next week! Thanks for the great tutorial and thanks to Monkey for the great Vanna White moments.
Such a cute video, Linda! Thanks. I’d love to have one of your pincushions.
me!me! pick me!
Love the tutorial, Linda. Been coveting those little finger pinchusions since I first saw yours. Often thought of the steps and supplies needed to make one – now I know for sure. Thanks for sharing in such a clever video, love Monkey!
Warm Hugs,
Marsha in DE, USA
It was wonderful to hear the William Tell Overture this early in the morning. It was perfect background music. The movie was great, and definitely has encouraged me to make a finger pincushion. You and Monkey work well together….however, if I may ask, does Monkey ever give you a list of “Backstage Demands”…..candy, sodas….ripe bananas???? Hopefully, he is not a temperamental actor. Grin
I really like the buttons. So many sizes from which to choose and more chic than a bottle cap. Thank you for sharing!
Hi Linda,
thank you für your tutorial. This was the correct inspiration to make one.
Hugs
Rita in Germany
Hi Linda and monkey
yes this is such a nice tutorial …and cute pincushion to make as gifts
Maybe I ‘ll make some for the Tuesday belgian meeting 😉
Hugs from rainy Brussels
Wonderful tutorial, Linda. I am going in the hospital again with my daughter and plan to take INKLINGO handwork with me to keep my mind and my hands occupied. I will have to make one of these before I go (hopefully) because it will be perfect to have one less thing to have to hold on to while I am working. Of course, in the event I can’t find my hot glue gun and run out of time to make one, I would love to be one of the lucky winners 🙂 Thanks for taking the time to share. Cathy in TN
These are the cutest little finger pin cushions I’ve seen! Thanks for the tutorial, going to have to try that now.
I’m glad you like it!
There will be one winner for every 25 comments, so please send the link to your friends.
Monkey says even if you don’t win a pincushion, one of your friends might see the movie and make you one.
Hi Linda & Monkey:
Nice video, music and it looks so easy to do. Thanks for the info.
I couldn’t live without mine and they have been given to me. Now I can make some of my own.
Mary Anne
What a wonderful idea….all of my sewing friends will be receiving one. Thanks, Beverly
Linda, love the william Tell overture and the buttons Much easier than poking holes in small bottle tops! I will have to get printing tomorrow.
Then I can use all the ‘leftover’ circles in a little art deco quilt. At least that’s my excuse, I really have to use them up don’t I.
awesome vid tutorial. . . ! it’s so easy to make. . . ! thank you!!!