
In my last article, Frame Your Patchwork of the Crosses POTC, I promised to show you a variation on No Waste Fussy Cutting. This is it!
Every quilter needs to know how to fussy cut!
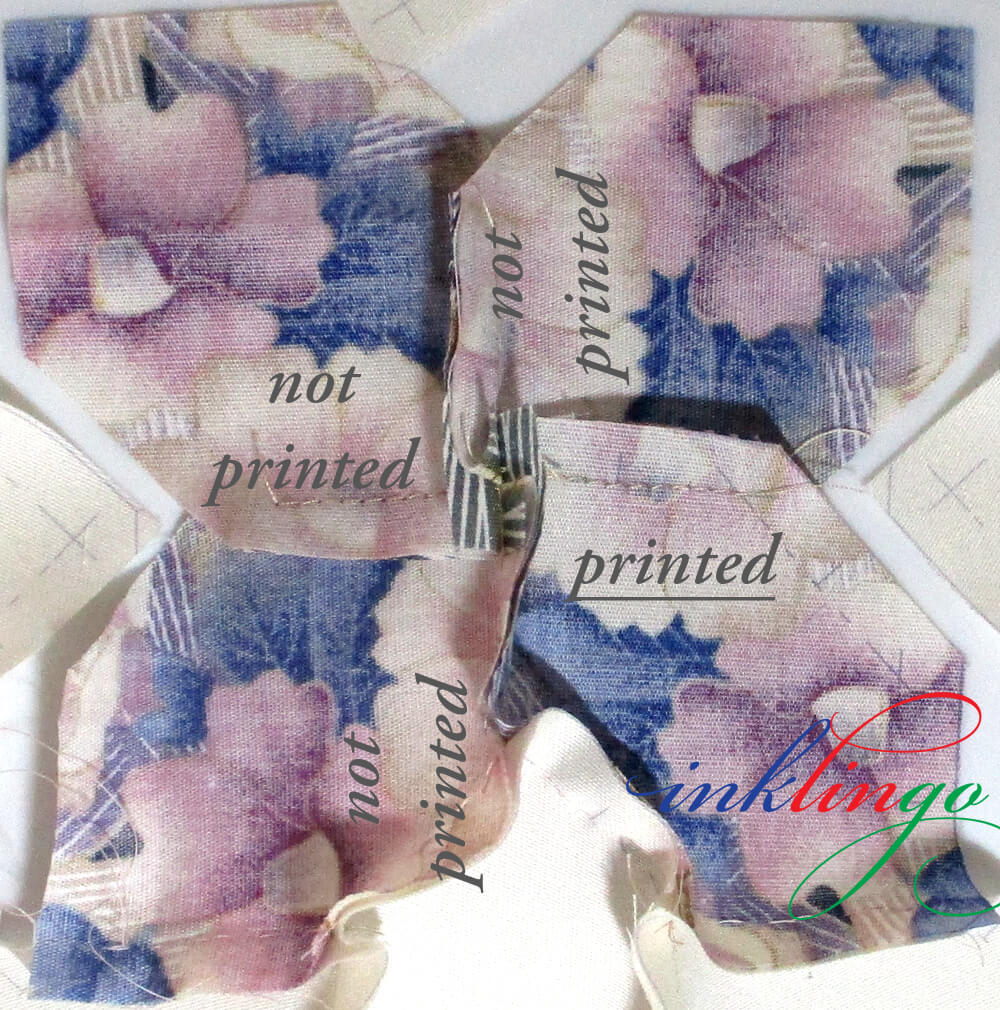
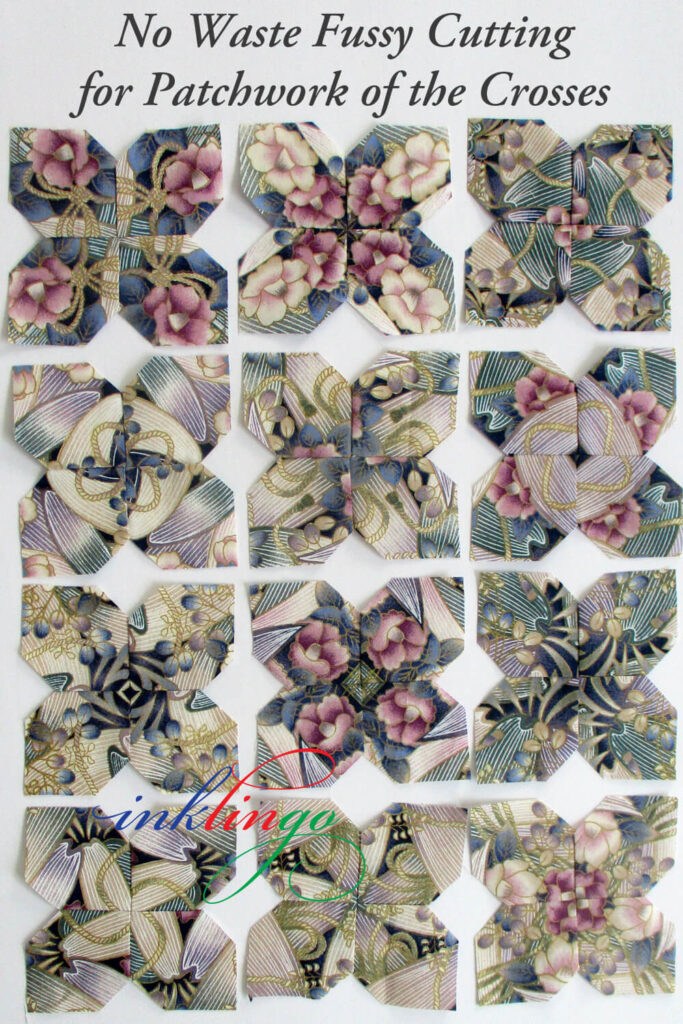
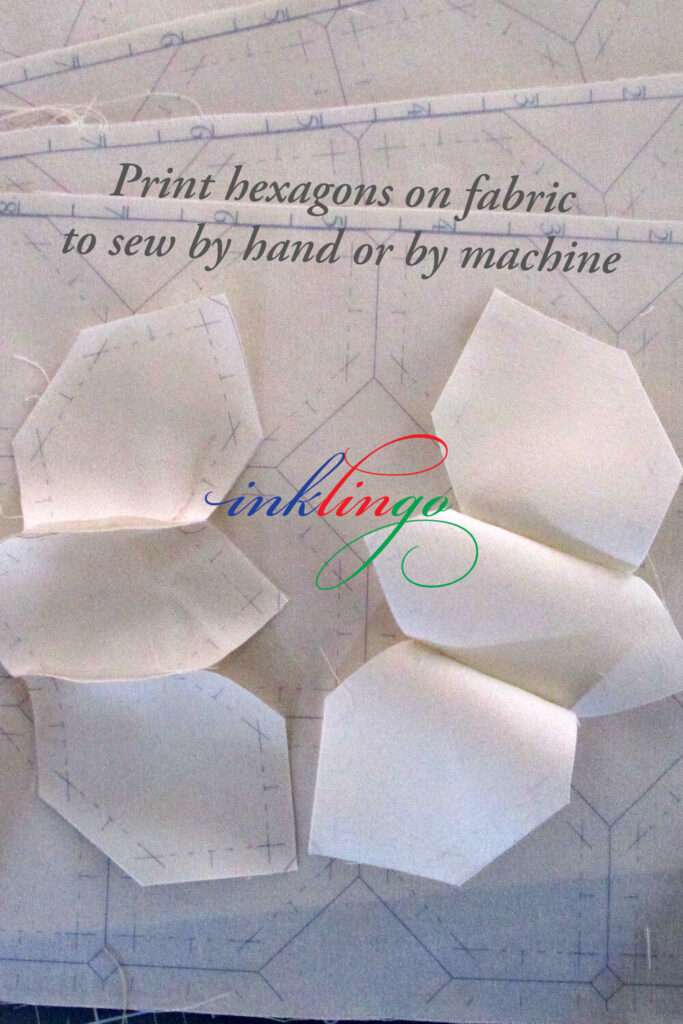
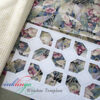
With Modified No Waste Fussy Cutting, you will not have lines printed on every shape (above).
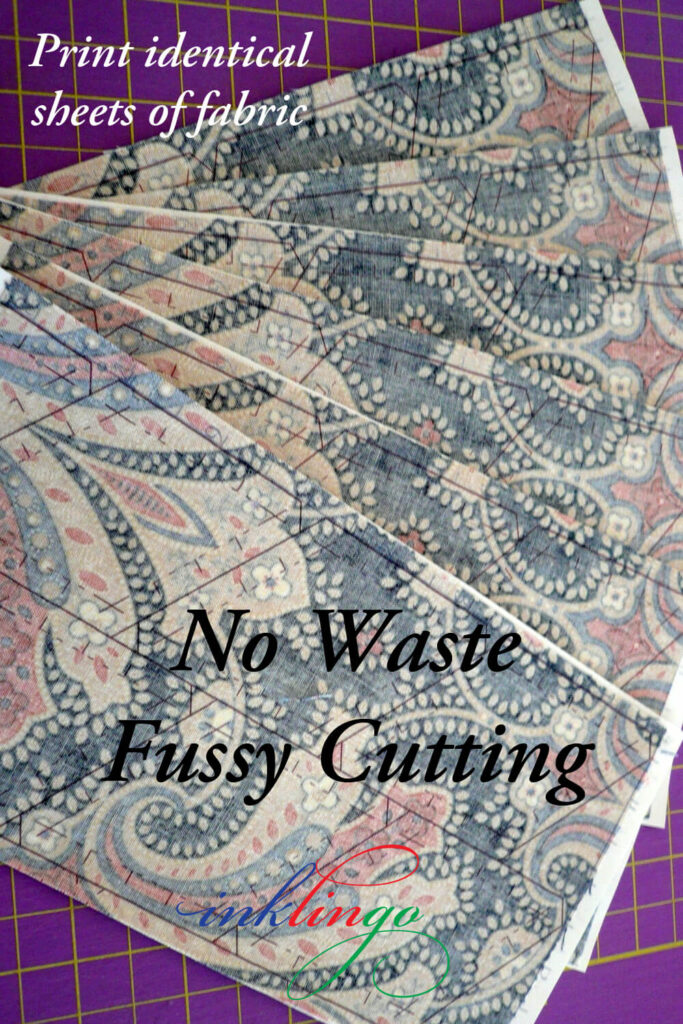
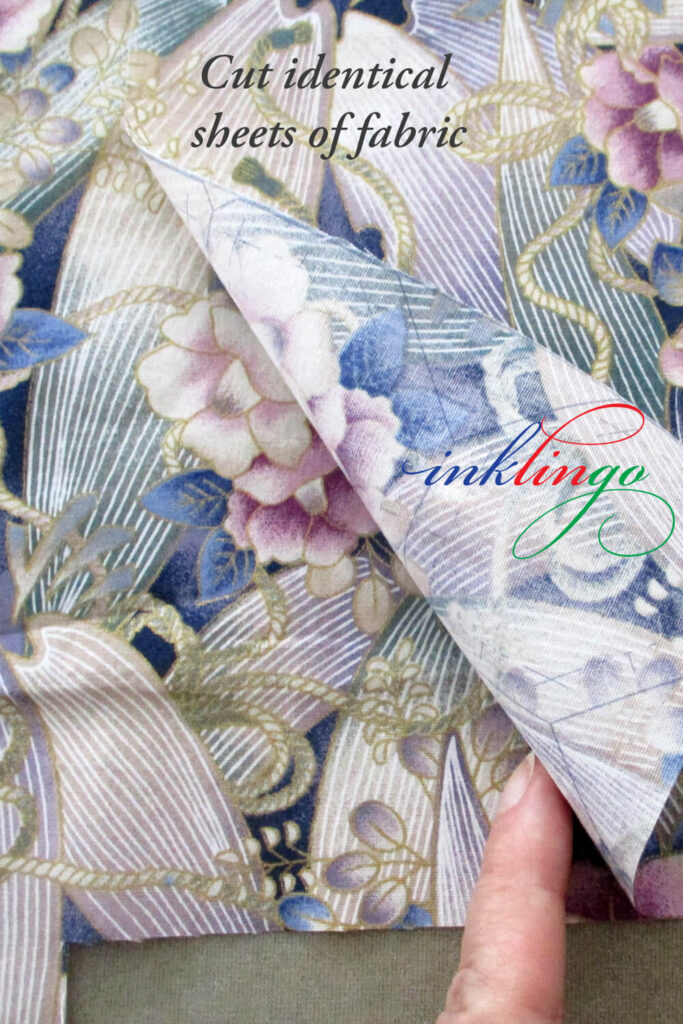
For this method, we only print one sheet of fabric, layer it with identical sheets of unprinted fabric, and use the top layer as a cutting guide.
That’s it in a nutshell. I elaborate on every step in the following photos. There are lots and lots of photos, and you are welcome to pin on Pinterest (as usual).
Inklingo methods of fussy cutting (freezer paper templates and No Waste Fussy Cutting) are safer and more accurate than using acrylic templates. (Why I don’t sell acrylic templates.)
I hope you will try Modified No Waste Fussy Cutting and let me know what you think!
No Waste Fussy Cutting
When you print identical sheets of fabric with Inklingo, you get sets of identical shapes!
With “ordinary” No Waste Fussy Cutting, we print identical sheets of fabric. It is necessary to position the freezer paper on the fabric precisely where the designs repeat. (Fabric repeats have been discussed in previous articles about No Waste Fussy Cutting. Search “fussy” to see them all.)
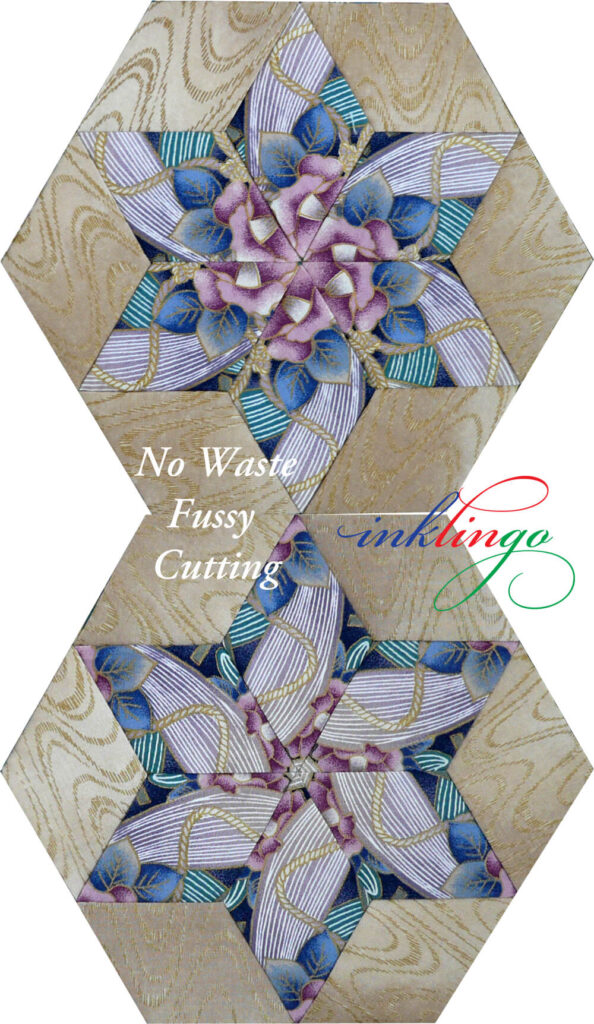
Printing sometimes results in slight variations in the sets of shapes, which can be bothersome to some quilters. (Look at the center of the stars.)
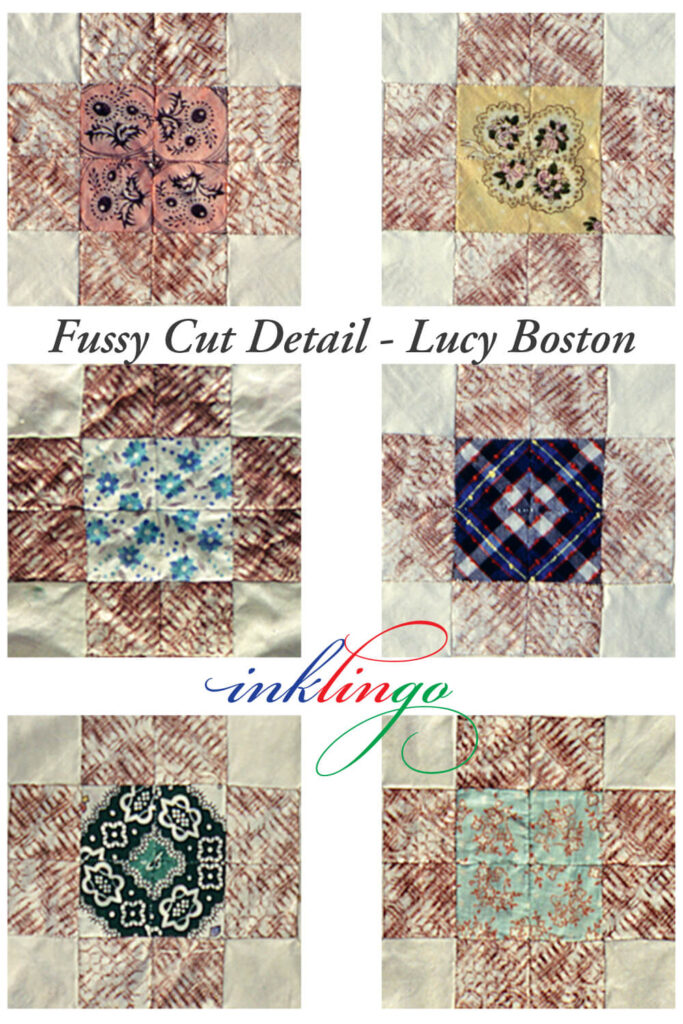
I find Lucy Boston’s little variations in her POTC quite charming (above).
Modified No Waste Fussy Cutting
My example today requires sets of 4 hexagons for POTC. It also works for other designs that require larger sets and for other shapes.
With this modified method, you will not have lines printed on every shape. The advantages are (1) less printing and (2) potentially greater ease in getting identical designs in each shape.
For Modified No Waste Fussy Cutting, we only print one sheet of fabric for each set of 4, layer it with 3 identical sheets of fabric (unprinted), and use the top layer as a cutting guide.
(NOTE: Machine piecers do not require sewing lines on every shape, so Inklingo quilters like me often print a sheet of fabric to use as a template for cutting shapes that will be machine pieced. That part is not new. This is the first time I have explained it for fussy cutting.)
Similar to Stack n Whack™
This modified method is very similar to Stack n Whack™. Modified No Waste Fussy Cutting requires the same kind of fabric designs. The techniques for stacking identical layers of a fabric repeat are the same.
One big difference from Stack n Whack™ is that I recommend washing the fabric first, so the quilt top will not distort later when it is washed. (Fabric shrinks unevenly.)
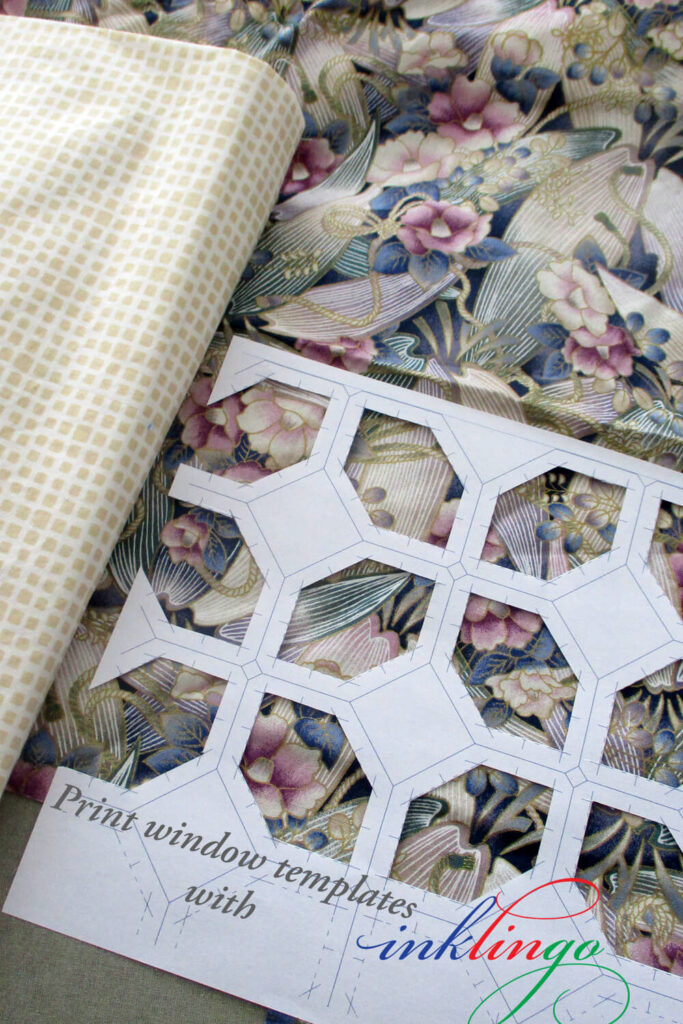
Preview with a Window Template
You can preview the placement of the freezer paper with a window template before printing a single sheet.
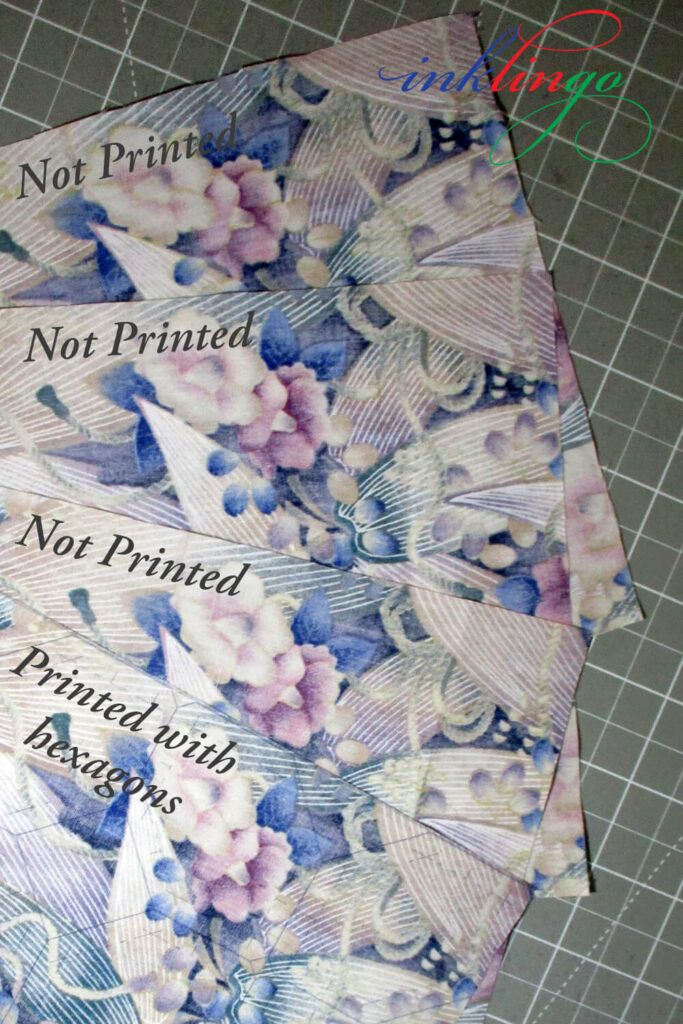
Trim the margins from the printed sheet of hexagons, layer it on identical repeats in the fabric, and cut.
Layer the Printed Sheet on Identical Repeats
One sheet is printed, and the other three are not printed.
Stack the four layers together with the printed layer on top, and press them together to prevent shifting when you cut.

If you are a very fussy fussy-cutter, you can baste the layers together before cutting, ensuring that the layers are stacked identically for each hexagon. If you are strategic in your basting, the stitches also keep the sets organized after cutting until you are ready to sew.
TIP: I printed 15 hexagons on a large sheet of fabric. (Freezer paper was 7.25 x 11.75.) The first time you try Modified No Waste Fussy Cutting, you might want to use a smaller piece. For example, print four hexagons using Layout 3 on freezer paper, as shown on page 25 of the POTC Shape Collection.
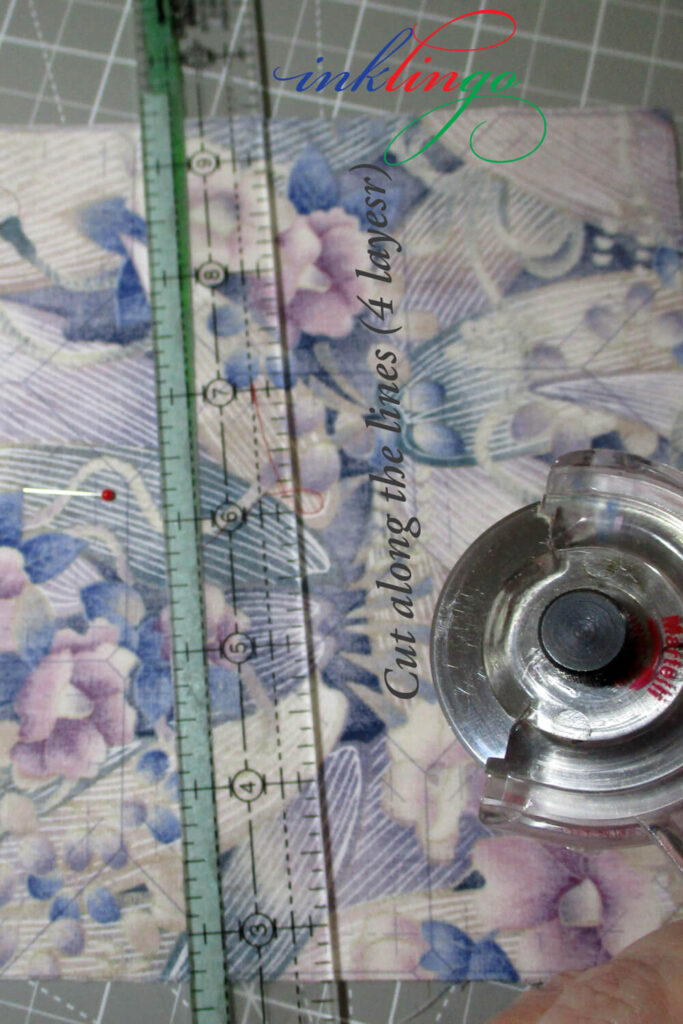
Cut 4 Layers At The Same Time
Use the top layer as a template to cut all of the hexagons. As usual, a fresh blade is essential when cutting multiple layers.
Voilà! Minimal printing, maximum “identicality,” cut several layers at a time, no acrylic templates.
Next, let’s see how we sew without all the sewing lines and crosshairs marked.
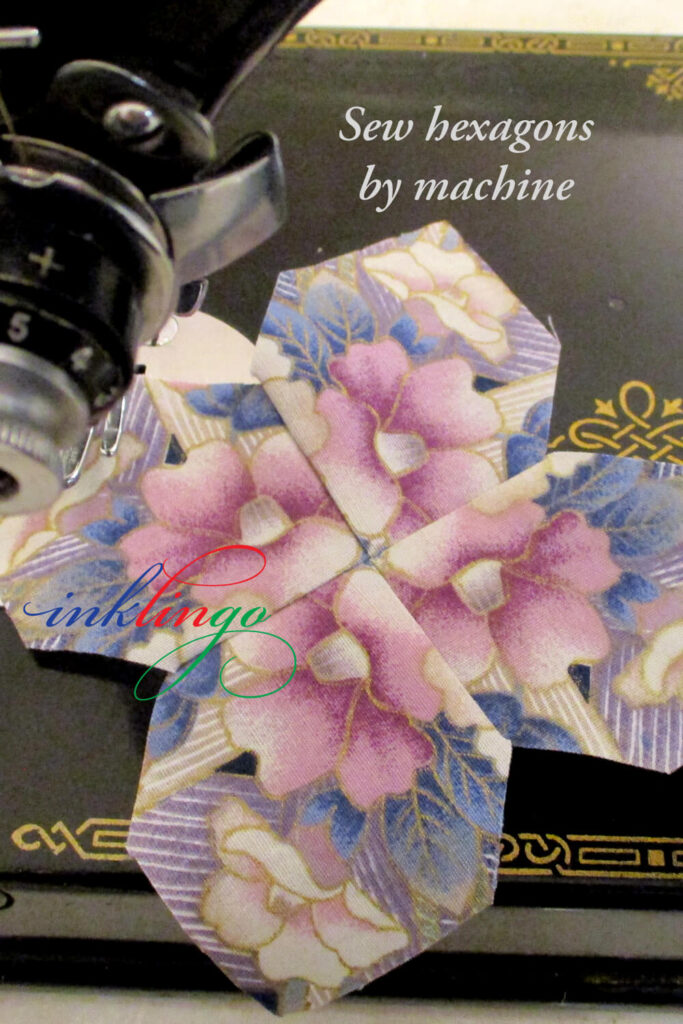
Sew 4-Patch Hexagons by Machine
I don’t need sewing lines printed on every shape when I machine piece, so I machine piece the 4-patch at the center of the block. It goes fast!
In no time, I sewed all the 4-patches for my wall hanging—and a few extras. (Previous article.)
TIP: You will thank yourself later if you use a printed hexagon to position a piece of masking tape on the machine bed to guide a scant 0.25-inch seam allowance. Add little marks to guide where to start and stop when sewing crosshair to crosshair—helpful when the crosshairs are not printed.
Why Didn’t Anyone Tell Me This?
I can’t believe I have been sewing since I was a little girl without knowing a simple machine piecing trick!
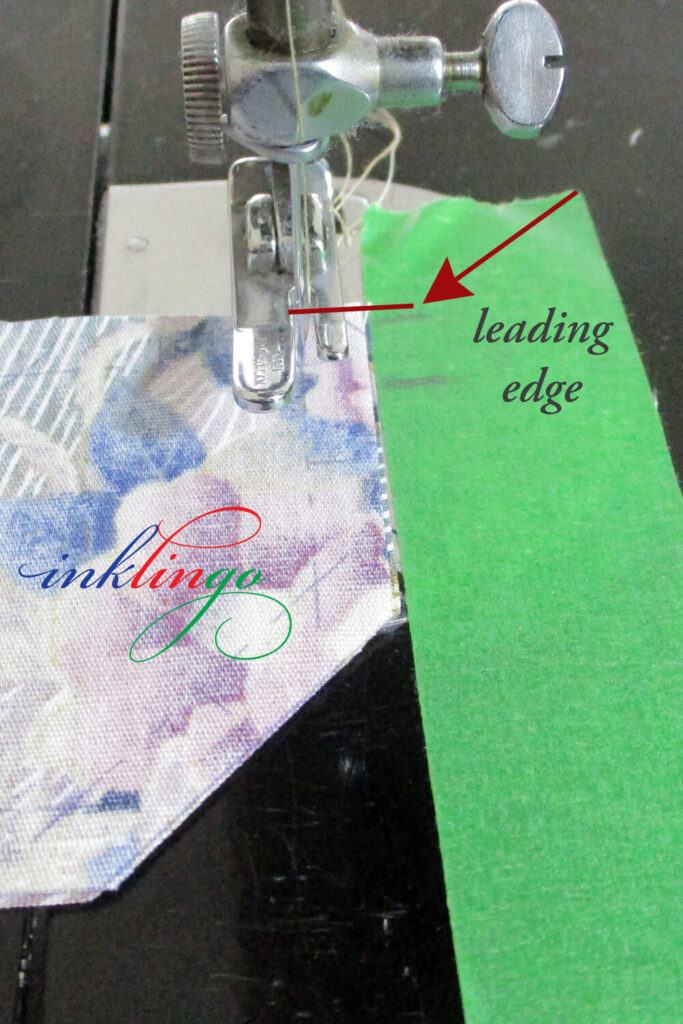
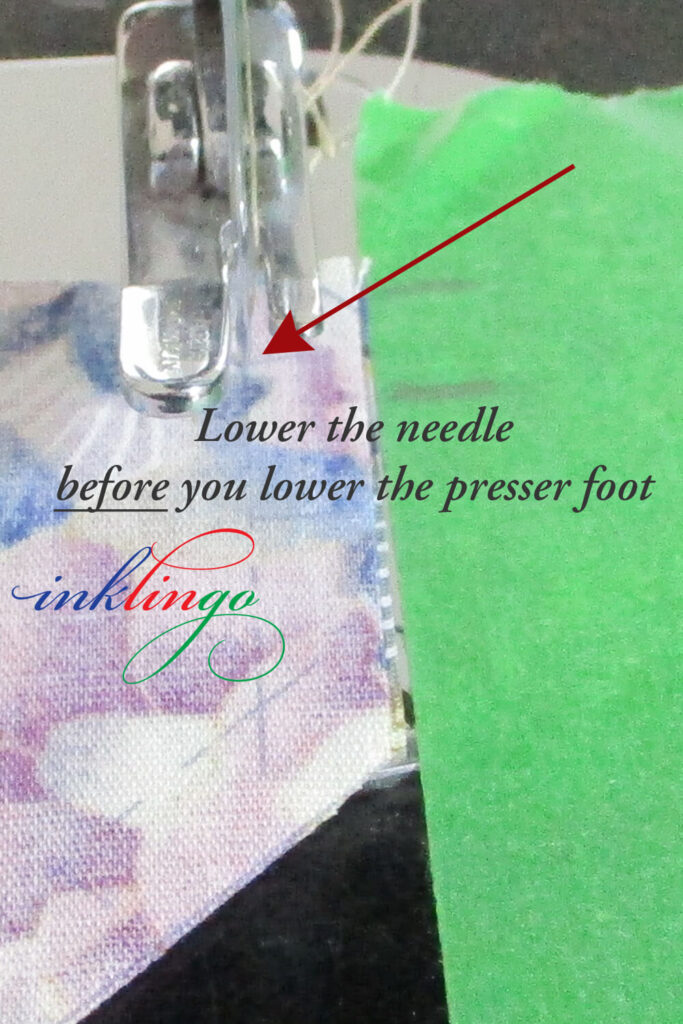
I was taught to use a small piece of fabric (Bonnie Hunter’s “leader and enders”) to keep the machine threads from tangling at the beginning of a seam. I recently learned from The Featherweight Shop that it is not necessary!!!! (They have fantastic video tutorials. No affiliation.)
On a Featherweight, if you lower the needle before you lower the presser foot, the threads don’t tangle! It is brilliant! No leader necessary.
I am making progress in breaking a decades-long habit of lowering the presser foot first. (I don’t know if all computerized machines allow you to do this.)
Print and Cut the Setting Hexagons
My setting hexagons are a plain ivory fabric. I printed all of them in the usual way. (12 hexagons for each block, about 10 sheets of 15 hexagons because I did a few extras.)
Remove the freezer paper, cut rows of hexagons, and stack the rows to cut several layers at a time, as usual. Machine sew them into sets of 3 hexagons as shown above and in the previous article.
Portable and Relaxing
It’s portable from now on!
So far, everything is sewn by machine. Louise (my Featherweight) has given me a very fast start on this quilt top, and now I can relax with hand piecing.
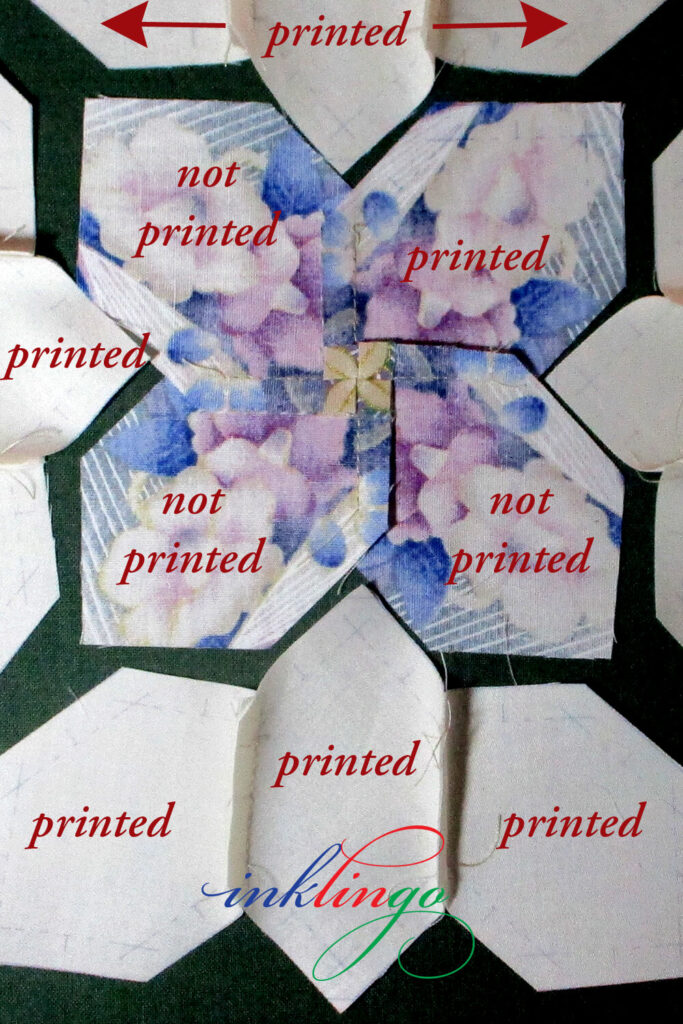
Only one of the hexagons in the 4-patch has printed lines (above), so I sew with the printed setting hexagons up (facing me).
You might be surprised by how easy it is to hand piece with sewing lines on only one of the two fabrics. The precision corners on the setting hexagons and the stitching lines on the machine-sewn hexagons help ensure everything is aligned perfectly.
Everything else is the same. Sew from crosshair to crosshair, as usual. These hexagons are perfect for relaxing, continuous stitching. Turn a corner at the end of every seam to keep on going. The crosshairs ensure that every intersection is perfect.
Uh oh. Do you miss the lines?
When you try hand piecing with only one fabric printed, you might miss the lines and wish you had printed everything.
Don’t worry.
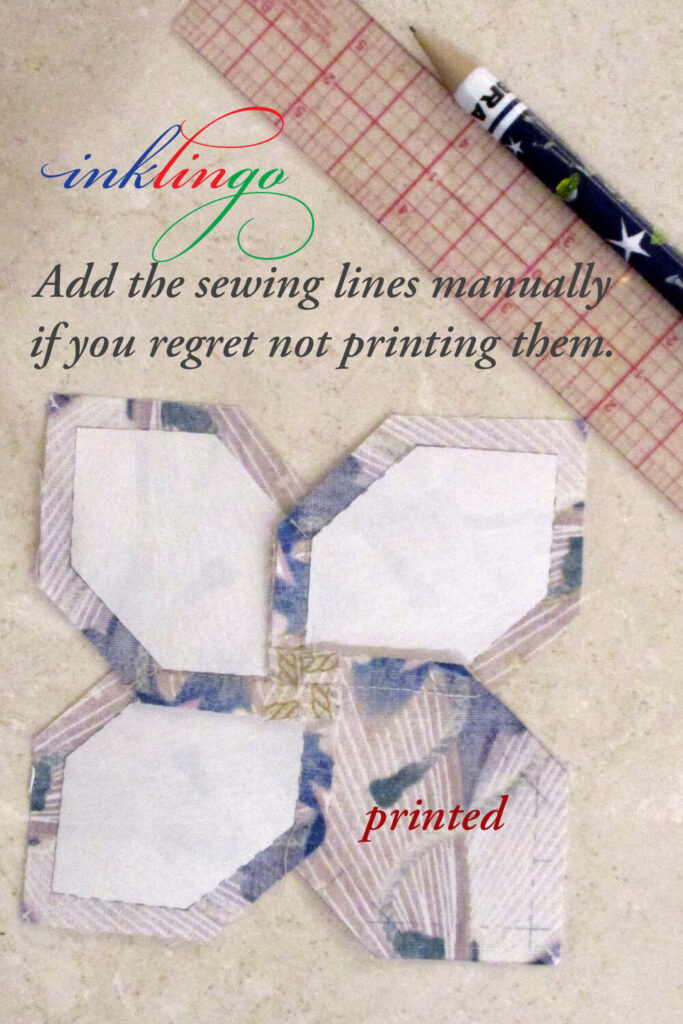
You can recover by manually marking the sewing lines, as we do for Quilted Diamonds. Press a freezer paper hexagon (no seam allowances) onto each hexagon, and use a mechanical pencil and a thin, flexible ruler to add the lines.
Hold the pencil lightly to make ultra-fine lines that imitate the effect of printing the lines and crosshairs with Inklingo.
More Resources in the Shop
Quilted Diamonds and Lucy Boston Patchwork of the Crosses teach everything you need to know about using freezer paper templates, marking the sewing lines and crosshairs, needles & thread, stitching, continuous stitching, circling the intersections, etc—all in beautiful detail.
Hand piecing with freezer paper templates is much faster and more accurate than EPP, and the blocks press beautifully. (Previous article.)
Of course, you can use all Inklingo methods of fussy cutting for English Paper Piecing, if that is the method you prefer.
To Print or Not to Print
I still prefer to print all four sheets of fabric for No Waste Fussy Cutting, but Modified No Waste Fussy Cutting might work well for you.
Now you know.
I hope you will try it and let me know what you think!
I’ve ordered the book here in Australia. I can’t wait to start working on it. Thanks for the info
I’m pleased you will have the book soon! In the meantime, there are several more articles and videos on the website that you might want to see. Three short videos here: https://www.inklingo.com/product-category/lucy-boston/ If you have questions, don’t hesitate to ask, okay?
Linda, I so admire your expertise and ability to what you do….I only wish you were my neighbor! Ha. Thank you for all you do. I am without a printer and have been for some time. Hopefully I can try this when I am able to. Thank you again and the best of luck to you and all your hard work!
What a lovely comment! Thank you, Sharon. I hope you can get an Inkjet soon. The good news is that it doesn’t have to be a fancy one. You can get whatever is on sale when you are ready. https://www.inklingo.com/faq/ If you have questions, please don’t hesitate to ask, okay?
LOVE, LOVE, INKLINGO for machine and hand piecing. Your method makes my work look sooo good.
Thank you for the hint about needle down!
Hi Frannie,
A message like yours lifts me up. Thank you.
Linda
PS I am getting used to needle down and love it!