
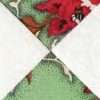
Are you ready to make a LeMoyne Star?

Once you make your first star, we think you will want to make enough for the pattern using the On-Point setting, as mentioned in my last message. It can be a great scrappy quilt, a real stash-buster, if you want to use fabrics from your stash.
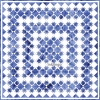
Eight-pointed stars are easier the Inklingo way, thanks to the precisely printed crosshairs at the end of every seam.
By Machine
It is simple to sew inset seams by machine by stitching from crosshair to crosshair, rather than edge to edge. Inklingo eliminates measuring and mistakes. You don’t need special rulers or markers—just Inklingo shapes printed on the fabric.

1. PRINT the shapes on fabric.
Print the shapes individually or use one of the combo layouts. For example, if you use the same fabric for your squares and QST, you can use the combo above.
Inklingo shapes always have correct straight grain if you iron the freezer paper onto the right side of the fabric with straight grain along the edges (threads parallel).
Inklingo uses fabric very efficiently.

2. STITCH the diamonds from crosshair to crosshair to make pairs and then join the pairs to make the star halves.

3. PRESS. Both halves should be identical, so the seams will nest with each other when you sew the two halves together.

4. STITCH the two halves together. The center intersection of the star is the key to this design, so I prefer to stitch this seam by hand and circle the intersection (The Inklingo Handbook, page 55), but you can do it well by machine if you pin (or tack at the crosshairs by hand) and stitch out from the center.

5. STITCH the QST and squares to the star, holding all of the seam allowances out of your way, and stitching from crosshair to crosshair.
You will love having the stitching lines and crosshairs printed on the fabric. It makes it so easy!
A GREAT TIP To start or stop precisely at a crosshair, when you are close, pause with the needle up and use the hand wheel (right side of the machine) to slowly lower the needle manually. Raise the presser foot slightly and nudge the fabric so that the needle is exactly aligned with the crosshair. You can learn to do this quickly with a little practice.
It is better to stop slightly short of a crosshair than to stitch beyond it. Un-sew any extra stitches to avoid puckering.
You may sew past the crosshair at the outside edges of the block, if it will not interfere with your pressing plan for setting the blocks.

6. PRESS as shown. All of the intersections open perfectly.
These instructions are in the free Inklingo Shape Collection for Diamonds/Triangles/Squares. There are also illustrated instructions for hand piecing and for precision machine sewing.

By Hand
Hand piecers also love the lines printed on the fabric—less preparation, more sewing time!
As usual, inset seams are simple for hand piecers, and all of the squares and triangles can be added with continuous stitching (red arrows above) without breaking the thread. Press the same as for the machine pieced block above.
Hand piecing instructions are included with the shapes to print on fabric in the free Inklingo Shape Collection for Diamonds/Triangles/Squares.
The diamonds, triangles, and squares in the free Inklingo shape collection can be used for many other blocks. You will be inspired by the gallery of quilts.
Why free?
You can learn how to download and how to print on fabric with zero risk.
I chose this way to “advertise” Inklingo. Instead of annoying you with expensive traditional ads and endless “special promotions,” the value goes directly to you, the quilter, and it keeps all prices low so everyone can learn to quilt. Once you try Inklingo, I know you will be back for more—and will tell your friends!
There are wonderful instructions for printing on fabric and sewing in the free shape collection, but if you have any questions, please don’t hesitate to ask.
Thank you for visiting!
Linda & Monkey

Oh that’s okay I just wanted to be sure that I could not use my iPad. I’m just trying to master the 6 pointed star. Mastering meaning piecing it by hand, by machine, English paper piecing, traditional paper piecing, Applique and all the math that goes with each technique. When I go to learn a new to me technique, I have to master each and every method. Top to bottom and front to back. Thank you 🙂 Amie
I have an iPad. I read I can’t use your Templates with an iPad. What do I do?
Hi Amie, I am sorry but Inklingo PDFs are not compatible with mobile devices like phones and tablets/iPad.
Eventually, it may be possible to use Inklingo on a phone or tablet but not yet. I’m sorry.
Inklingo uses printing features which work best on computers (PC or Mac). Even though it is possible to print from some tablets, a small screen is a drawback, especially for printing custom sizes. I am concerned that a quilter might buy Inklingo and then be frustrated when it came time to print–the key feature. In addition, all of the prices would have to go up because the fee I pay for copy protection would be significantly higher than it is now, plus I would have the expense of re-formatting everything going back to 2008. (You can see the long list under the Shop tab.) It seems unfair to make everyone pay a higher price unless there is more demand for it than there is now. I hope that by the time quilters request it, the cost of implementing it will be less than it is today.
If you have any other questions, please ask. I always answer as quickly as possible and I am happy to help. I hope you have a wonderful weekend with as much time to sew as your heart desires.
Hugs,
Linda & Monkey in Canada
Hi Carol,
Yes, it is the same as sewing from “dot to dot” but with Inklingo, there are no dots. Inklingo prints everything on the fabric itself, so you don’t have to mark dots. Inklingo prints an X at the seam endings, as shown in the illustrations. Where the two lines cross is called a “crosshair.” Inklingo is faster and much more precise than marking dots.
I think the easiest way to see how beautifully it works is to order and download the free shape collection and make a LeMoyne Star with Inklingo. There are detailed instructions for printing on fabric and sewing LeMoyne Star in the free shape collection.
If you have any other questions, please ask!
Hugs,
Linda & Monkey
this may sound stupid but what does stitching to crosshair mean is it the same as stitchinf from dot to dot?
You are too good for us Linda!
This is a great idea!! And very well suited for either machine or hand piecing! I have always loved the combo layouts in the free LeMoyne Star pattern. The one shown above is handy if you just want one background, but there is another one that can be printed on two different fabrics so that you can have two mirror image blocks. So easy!!
Thank you!!!