
There are two methods of fussy cutting with Inklingo.
1. Traditional – Printing templates to make Swiss cheese of the fabric.
2. No Waste Fussy Cutting – Printing identical sheets of fabric.
In this installment:
- Choosing fabric for No Waste Fussy Cutting
- Tips for printing identical sheets of fabric
FABRIC FOR FUSSY CUTTING
The key to Inklingo No Waste Fuss Cutting is choosing the right fabric. If you get that right, everything else falls into place.
Any fabric that works for Stack N Whack™, Kaleidoscope Stars, One Block Wonder and similar techniques works for Inklingo No Waste Fussy Cutting.
If you have any of those books, the information about choosing fabric also applies to Inklingo.
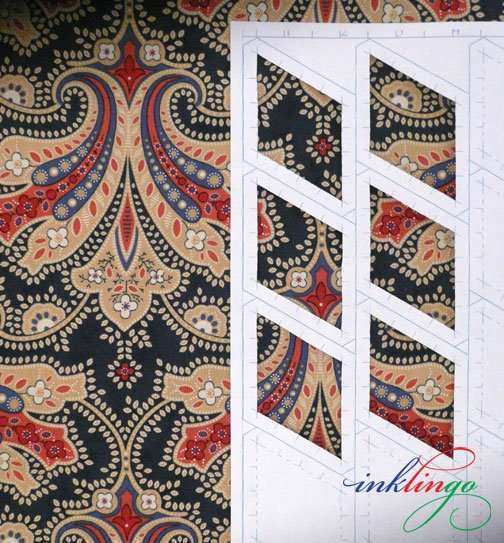
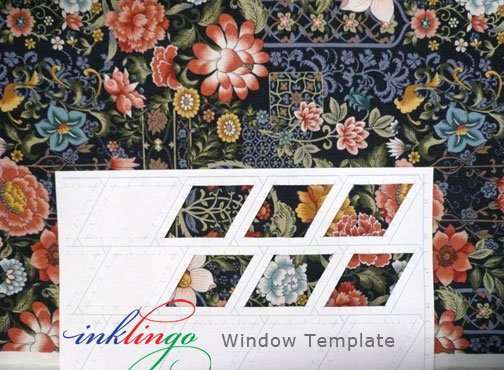
Window templates are a simple, easy, reliable way to determine the suitability of a fabric for fussy cutting a particular shape and size.
For me, a window template works much better than acrylic shapes (and costs nothing!).
If you have a folding mirror, you might find it helpful to see the effect. When you get a little bit of experience, you won’t need the mirror anymore.
I can see great possibilities for this fabric! (No folding mirror or acrylic needed!)
If you use a window template, you don’t have to remember any rules but you will probably notice some common characteristics:
- overall designs without a lot of plain background
- medium to large designs, depending on the size of the shape
- at least 3 or 4 colors
- variety of lines
- shapes with defined edges
- high contrast
.

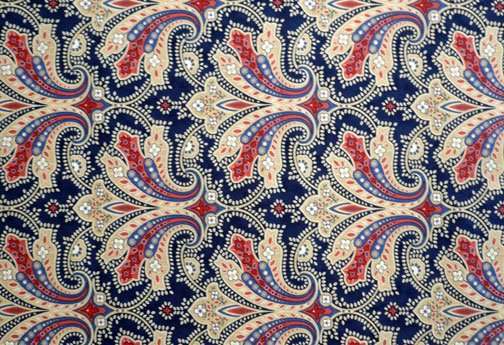
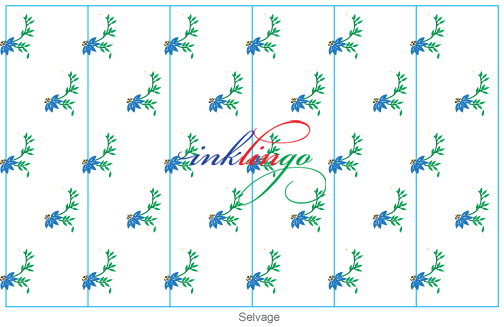
FIND THE REPEAT
The next step is to find the repeat in the fabric. This is the same as Stack N Whack™ and other kaleidoscope techniques.
If you have ever hung wallpaper, you are familiar with this idea. A “repeat” is the measurement parallel to the edge (selvage) from one motif to the next, where the design starts over again.
In the illustration above, I isolated one blue flower. No matter what part of the design you choose, the measurement to the next identical motif will be the same, so you can choose any easily identifiable shape as your starting point.
.

MEASURE THE REPEAT
The length of the repeat will determine how much fabric you need.
For example, 6 repeats of 12 inches = 72 inches (2 yards).
.
TIP If you don’t have enough fabric to cut all the repeats along the length of the fabric, you can locate and use repeats across the fabric.
With many fabrics, you can use repeats from anywhere, not just along the lengthwise (selvage) grain. This can reduce the amount of fabric you need to buy.
It might also mean a favorite fabric in your stash will be enough!
(Stay tuned for another article with details for determining fabric requirements.)
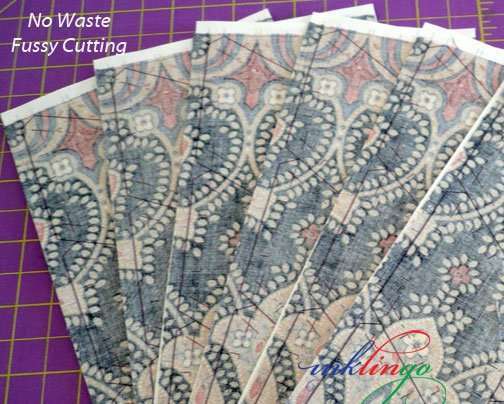
PRINT IDENTICAL SHEETS
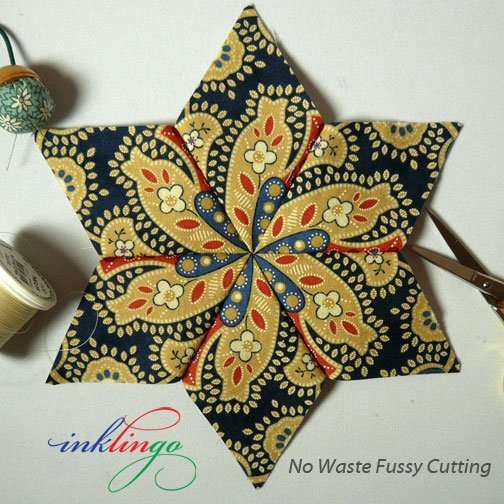
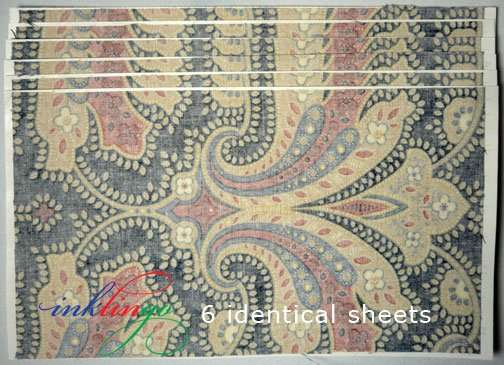
Are you ready for a little miracle? This is it! When you print identical sheets of fabric with Inklingo, you get sets of identical shapes!
In this example, I printed 6 identical sheets of diamonds for the Case of the Diamond Necklace Mystery (COTDN).

That gives me sets of 6 identical diamonds to make fabulous kaleidoscope stars.
For 36 diamonds for the COTDN mystery quilt, I printed 6 identical sheets of diamonds 4.5 x 8.5 inches. (That is one of the Suggested Custom Sizes in the 60° Diamond 1.75 inch shape collection.)
I cut off the selvage (as usual) and rotary cut a 4.25 or 4.5 inch strip long enough to include 6 repeats. Then I cut the strip into identical sections, iron to the FP and trim.
TIPS FOR PRINTING IDENTICAL SHEETS
Printing identical sheets takes a little bit more “fussing” but almost everything is the same as ordinary non-fussy-cutting printing. (Best Tips in the Top Ten Tutes)
For example, I always wash the fabric first. Always! Some say this will distort the printed design. That is exactly my point! If it is going to distort, I want to know about it before I invest my time and creativity!
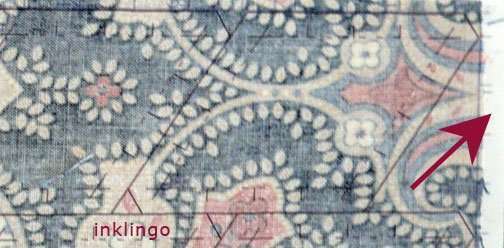
My Canon printer is beautifully jam-free (another Top Ten Tute) if I leave about 1/8 inch of FP without fabric on the leading edge (red arrow).
If you have checked the Top Ten Tutes, you know that leaving the leading edge bare is easy to do for non-fussy cutting. I just position the freezer paper on the fabric at the ironing board with the FP overhanging a straight edge of fabric and trim the other three sides of the fabric to match the FP. (Best Tips in the Top Ten Tutes)
This step is slightly different for No Waste Fussy Cutting: To leave the leading edge of the FP bare and get identical sheets, I need to cut the fabric and the FP separately and then line them up. . . identically . . when I press them together.

When I first started printing identical sheets of fabric, sometimes there were small variations in the diamonds. In the star above, you can see that the diamond in the 5 o’clock position is slightly different from the others. It is still a very pretty star.
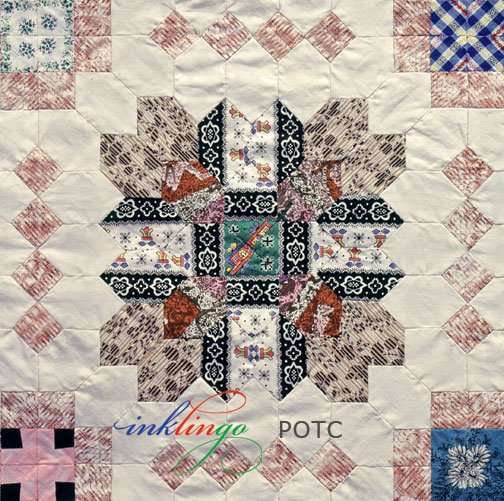
Not a problem? In some situations variations add more charm for me than mechanical precision does. This is a fabulous example from Lucy Boston’s Patchwork of the Crosses.
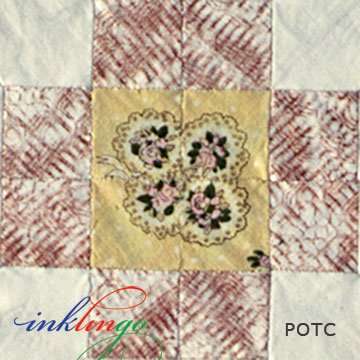
Lucy Boston’s fussy cutting often had variations—and her work is stunning.
In this second example from Lucy Boston’s Patchwork of the Crosses, the flowers are not positioned exactly symmetrically. In fact, if you look closely, they are not even identical flowers! I think I love it even more for its quirkiness. This happens many times in the POTC quilt.
This might be the best tip!
In situations where it is important that every shape is as close to identical as possible, there is a simple solution.
Before you print, double-check that the fabric is positioned identically. To do that, stack the sheets with an offset (above). Repeat for all four sides.
This simple visual check will tell you whether you want to re-position the fabric on some sheets to match the others.
If one sheet just will not match, you can cut another sheet that will—if you have enough fabric.
That brings us to a new topic for a future article: How to determine yardage requirements for fussy cutting. I have written about this before (and the blog is searchable). I have more info about using Inklingo templates for traditional Swiss cheese fussy cutting too.
In the meantime, I hope you are following The Case of the Diamond Necklace Mystery Qult.
The mystery quilt is very pretty without fussy cutting but I hope I have tempted you to try it!
.

This VIDEO on the Welcome to Inklingo page on the website explains how Inklingo works.
If you know anyone who is interested in learning about Inklingo, please let them know. The COTDN mystery is great for beginners AND experienced Inklingo quilters too. The clues for the Case of the Secret Garden (COTSG) and the Case of the Stranger in Margaritaville (COTSIM) are still on the blog, so you can see what to expect.
The new mystery is NOT just for hand piecers. There are instructions for machine piecing too.
ARE YOU SUBSCRIBED?
Please subscribe to the blog and follow the Inklingo Facebook page for more.
- How to Fussy Cut with Inklingo – Part 1
- COTDN Clue # 2 (8 pages, PDF to download)
- COTDN Clue # 1 (5 pages, PDF to download)
- COTDN Intro Notes (4 pages, PDF to download)
Please tell your friends about Inklingo. The more, the merrier!
Linda & Monkey
![[]](https://www.inklingo.com/wp-content/uploads/2011/04/inklingo-heart.png)
New to Inklingo? Order and download free shapes and start sewing in the next few minutes. Main Beginner’s Page There are triangles, diamonds, and squares in the free collection—great for dozens of different blocks.
$10 Coupon! 10 Year Anniversary Special on the handbook

Thank you, Deborah!
absolutely gorgeous!!!
Would love to learn these techniques!
Hi Cathi,
I am glad you are making the COTDN mystery! That is a great tip!
Hi Joanne,
Your fussy cut stars on Facebook are beautiful! It is addictive, isn’t it? 🙂
It took me a few tries before I got perfect results with fussy cutting too. Now I check that all four sides look identical and re-position on the FP before I print, if necessary.
Great tips, Linda! Because my Canon also prints much better when I leave a bit of the freezer paper along the leading edge exposed, I take a second to draw a very fine line on the freezer paper that’s just short of a quarter inch and then, when I’m ironing the fabric to the freezer paper, make sure my fabric is always right at that line.
Excellent tips, Linda! Thanks so much.
I had problems with the alignment on the pink and green fabric I am using for COTDN. You may have seen it on my facebook posts to the group. I don’t recall if the fabric was washed before I stashed it.
I tried my best to line up the TOP and LEFT side of my fabric, and printed 8.5 x 11 sheets. (This gives me more than twice as many stars as I need for the mystery quilt). The first stars I pieced were from the right side of those printed sheets, and they have some lack of symmetry in the center that bothers me. I am now piecing a few from the left side of those sheets, and the first one turned out perfectly. Maybe I should have printed smaller sheets so that the deviations would not have been so big from one sheet to another.