
Update June 2024: This article was originally published in 2012 for the Love the Lines Contest, but the tips are still good today. I have removed out-of-date references.
Free Electric Quilt Project Files
Several free Electric Quilt Project Files have been added by and for Inklingo quilters over the years.
You do NOT need EQ to use Inklingo, but Electric Quilt can be a great tool for designing with Inklingo shapes.

Designing in Electric Quilt Software with Inklingo Shapes
I have a few simple tips to get you started.
- Block Library
- Add Borders
- Alt-Click
- Ctrl-Z
- Add to Sketchbook
- Fabric Library
- Swap Colors

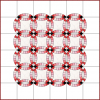
This quilt in the Drunkard’s Path Design Book has been popular. It is easy peasy to design in EQ.
Inklingo Sizes for Electric Quilt Design
The first thing is to identify the sizes available in Inklingo format.
 Inklingo has 6 sizes so far!
Units are 2, 3, 3.5, 4, 6, and 7 inches.
You can see all available sizes on the website, either in the Index of Shapes or on the Main Drunkard’s Path Page.

Drunkard’s Path Blocks with Inklingo
With 2-inch units, these are 4-inch blocks.
With 4-inch units, these are 8-inch blocks.
With 6-inch units, these are 12-inch blocks.
Are you with me so far?
Drunkard’s Path in the EQ Block Library
This block is already in the EQ block library, so I don’t need to draw it! It has been waiting there patiently for me, looking green.

How did I find it? I just scrolled through Libraries > Block Library > Classic Pieced > Drunkard’s Path, and there it was. Of course, the colors are not what I want, but the outline gives me a head start. If I had known the name of the block, I could have used the Search button. (Libraries >Block Library > Search > By Notecard > Baseball)
I add it to the Sketchbook (button on the bottom right, above).
NOTE: The size of the circle relative to the square might be slightly different than the actual Inklingo shapes, but it won’t matter for this design. We are just designing in EQ. It won’t make any difference when it’s time to print and sew with Inklingo. (In some cases, it would.) I have not even bothered to check. It looks similar, and that’s enough.

(Notice that the Project Sketchbook has different tabs for Quilts, Blocks, Fabrics, etc. I’m on the Blocks tab.)
Change the Color of Blocks in Electric Quilt
Sketchbook > Blocks > Edit, and I can create the two color variations I want to start with. That is just a few clicks of the mouse. Then add to Sketchbook.
We’re making progress!
My blocks are ready, so I will now design with Worktable > Work on Quilt.
Start in the Middle of the Quilt
Since I view this quilt as a series of borders, I start in the middle and add one border after another, choosing the border Style “blocks” from the dropdown menu and using the 4-, 8-, and 12-inch blocks. (The ones made with 2, 4, and 6-inch units, shown above).
If you have played with EQ a bit before, that is probably all you need to know.
Step-by-Step in Electric Quilt
On the other hand, if you haven’t used EQ for a little while, here are a few hints:
Worktable > Work on Quilt
Quilt > New Quilt > Horizontal

Layout > 8 x 8 and Finished size of blocks 4 x 4

Layer 1 > Set Block > Sketchbook Blocks opens > Alt-Click to set one coloring of the block.
- Click sets the block in one space.
- Alt-Click sets the block in every other space.
- Ctrl-Click sets the block in every space.
That’s a really cool thing to know! Monkey has to take a deep breath and think about it. We love the way EQ speeds up the process!
Alt-Click on the other coloring to complete the checkerboard. Of course, you can click in each space individually, but Alt-Click is magical!
There is more magic to think about, too: The block in the Sketchbook is sizeless. Its size is determined by the space in the quilt layout where it is placed. It’s just plain brilliant!
Stop and think for a minute, if you like. We’ll wait.
Best Tip for Designing in Electric Quilt—Control-Z
If you make a boo-boo, use Ctrl-Z to “undo.”
It’s not just for Electric Quilt. I use Control-Z all day long, no matter what software I’m using. Since this shortcut works in almost ALL software, it is worth learning. I even used it when I was writing this paragraph!
You can undo 10 steps in EQ—or even 20 steps, if you change the default settings (File > Preferences > General). I leave mine set at 10 undos. “Undos” is a funny word for a great, great tool.
Add to the Electric Quilt Sketchbook
By the way, this is a good time to “Add to Sketchbook.” I do this a lot. I end up with several unfinished layouts in my Sketchbook, but they can be handy if I lose my way in a design and realize I want to start over—without having to go back to square one. The extras are easy to delete at the end.

It’s good practice to click “Add to Sketchbook” often!
Adding Borders in Electric Quilt

I will use six borders. Each border is numbered out from the center by EQ. When you add a border, it is added outside the one that is currently highlighted in gray. You can click on another border to insert a border between others.
After you have done one or two borders, it makes complete sense, but here are the numbers I used:
Borders > 1 > Blocks > 8 – 8 – 8 – 8 (Use the slider to change them all at once.) and Blocks in border 4 x 4. (Notice how that makes them squares.)
Add to Sketchbook? Good idea!
Borders > Add > 2 > Style Blocks > 8 – 8 – 8 – 8, Blocks in border 6 x 6
Add to Sketchbook
Borders > Add > 3 > Style Blocks > 4 – 4 – 4- 4, Blocks in border 16 x 16
Add to Sketchbook
Borders > Add > 4 > Style Blocks > 12 – 12 – 12 – 12, Blocks in border 6 x 6
Add to Sketchbook
Borders > Add > 5 > Style Blocks > 12 – 12 – 12 – 12, Blocks in border 8 x 8
Add to Sketchbook
Borders > Add > 6 > Style Mitered > 0.5 – 0.5 – 0.5 – 0.5 (This represents the binding.)
Add to Sketchbook

The whole layout is ready and waiting to be filled in with blocks!
Setting Blocks in Electric Quilt Software

Layer 1 > Set Block > Click to fill in all the spaces.
Remember that if you put the wrong coloring in one of the spaces, you can use Ctrl-Z if you notice it right away. Otherwise, you can click on the correct coloring in the Sketchbook and click again to replace it. EQ is very forgiving.
Add to Sketchbook
Layer 1 > Paintbrush to fill the final border. Ctrl-Click fills the same color on all 4 sides at once.
Add to Sketchbook

Clean Up the EQ Sketchbook
I saved 7 times in this example, so I should clean it up.
I don’t consider this design to be finished. It is just a starting point. It could be scrappy or multi-colored, and the borders could be in a different order. I could also use more shapes, as long as the sizes match Inklingo sizes.
It is such a bold design that if I were sewing it for our bedroom, I think I would like to see it in all neutrals, with low contrast, a curvy feel, and a relaxing atmosphere—maybe replacing the white with several different ivory fabrics and the red with several different beiges and taupes. What would you like to see?
Electric Quilt Fabric Library
There are fabulous choices in the Fabric Library—including real fabrics you can find in your local quilt shop!
Northcott provided wonderful prizes for the contest in 2012, so let’s check the Northcott folders first:
Libraries > Fabric Library > By Manufacturer > Northcott > Stonehenge Ooh! Be still, my heart!

Swap Colors in Electric Quilt
I can change all the white to ivory and all the red to blue using the “Swap Color” tool.
Two or three clicks—and done!
I’m going to keep playing with this one. When I’m finished, Inklingo will show me exactly how much fabric I need. (Electric Quilt provides fabric estimates, but Inklingo is more accurate.)
Inklingo curves are the easiest ones you will ever sew, thanks to the perfect shapes and matching marks printed on the fabric! It is all described in the Drunkard’s Path Design Book! There are dozens of designs to get you started.
Thank you for visiting!
Linda & Monkey
 .
.

Hi Cyn, I am very pleased that you liked the tutorial. There are more coming too. I hope you will enter a design. I have received a few contest entries and I can already tell that everyone is going to want the files for the top 25. 🙂
Oh, Linda, what an absolutely fantastic and simple tutorial you have written. What an incentive to enter the contest & be successful with a design.
Great instruction – so clear! Love it. Thank you, Linda. I have bookmarked this blog entry to I can refer back to it easily and quickly. Many of us are reaching outside our comfort zones to become more proficient in EQ. I know I am. Your guidance, support and encouragement are deeply appreciated. Thank you!
Thanks to Monkey, too, as I bet he had his hand and two-cents in this tute somewhere. lol
Hugs,
Cyn; -)
This is a fabulous tutorial – and I know I’ll be referring to it often as I plan and design a quilt or two for the contest! You’ve made it so easy to understand that I know I won’t get frustrated and give up!
Hi Jillian, There will be discussion and tips in the Inklingo Yahoo Group too. That is a great place to ask questions if you get stuck, but I think you will be amazed how quickly you pick it up.
Okay, you have convinced me. I’m going to take an hour a day to learn EQ. I want to give Anneke stiff competition in the Love the Lines contest!
Don’t know enough yet about what I want to learn to ask about it. I’m hoping the shapes I want are in the EQ block library already…